Top Frequently Asked Questions & Answers on Smoking Briskets

A beef brisket is known as one of the toughest parts of a cow you can put on your smoker, though when prepared and cooked correctly it can be the best tasting and most tender meat you will ever eat. Here are 14 Frequently Asked Questions (FAQs) that will help you, prepare, and barbeque a beef brisket, Texas style, so you can impress your friends the next time you are cooking BBQ! Enjoy this BBQ Brisket Recipe.

  • What temperature should I pull the brisket off the smoker?

Answer: Smoke Temp should be about 225-275. Take it to 165, foil it, take it to 205, pull it, let is rest in for 30 minutes, slice and that is about it.  Or to even make it easier add about an hour to the cook and do not use foil and let the brisket smoke to 205.If you do all that, you will have the perfect brisket

  • Why did my brisket turn out tough?

Answer: A brisket that is tender like that is pure gold for a smoker. The problem is that a brisket is one of the more challenging cuts of meat to smoke, If the brisket is tough, it is because it needs more time to cook to tenderize and break down the connective tissues, or the brisket is cut with the grain instead of against the grain. First Step Video on preparing a brisket to a guarantee tenderness.

  • Why do you let a brisket rest?

Answer: The reason why you want to rest the brisket is that it allows the juices of the meat to thicken slightly. The degraded and dissolved proteins from the brisket’s juices will thicken ever so slightly, which slows down how fast the juice pours out of the meat when you first cut into the brisket.

  • What makes a good bark on brisket?

Answer: Bark is the combination of the good BBQ rubs that you apply on your meat and the smoke from your smoker, combining with the meat protein in a chemical reaction with the charcoals and woods. Good bark on a brisket or pork butt will make the meat resemble a giant hunk of dark crusty meteor of flavor

  • Do you smoke brisket fat side up or down?

Answer: If you decide to cook your brisket fat side up, you should know that the fat acts as a heat shield protecting the beef. If your heat source is mostly from the top, such as with many horizontal offset smokers, fat side up should be the way to go. It is a myth the brisket will self-marinade itself with the fat as it cooks, meat is not a sponge.

  • When should you wrap a brisket?

Answer: When wrapping your brisket in foil or butcher paper, I recommend waiting until your meat hits 165 degrees Fahrenheit internally. This will help you build up a nice bark on the outside of the meat and give you that beautiful red smoke ring.

  • What’s better point or flat brisket?

Answer: The point has more fat content, it is thicker, and some say a more flavorful cut. The point is the cut that “Burnt Ends “come from. The brisket is a tough cut of meat. Some prefer the point because it tends to be more tender and juicier after cooking. The flat or round cut is much leaner and is best sliced as thin slices and is tougher to smoke to correct tenderness. Here is a video on how to prepare burn’t ends

  • Should I separate point from flat brisket?

Answer: Therefore, after your traditional brisket butchering (Packer Brisket), you need to start to separate the flat form the point. In short, you want to remove the fat layer between the point and the flat. Using a sharp boning knife expose the point meat so it can absorb smoke. You do not have to completely separate the muscles.

  • What temperature does brisket fat melt?

Answer: If you cook the whole brisket at a traditional smoking/barbecue temperature of 225 F or even 300 F, the fat will slowly melt and render out during the long cooking time, leaving rich beefy flavor behind.

  • How long does brisket stall last?

Answer:   The brisket stall or pork butt stall can last anywhere from 2-6 hours, but 4 is about average.

  More Information on the Stall:  https://three-little-pigs-bbq.com/what-is-the-stall-on-pork-butts-briskets/

  • Do you wrap brisket during the stall?

Answer: When you do not wrap your meat or use butcher paper, all the juices drip away from the meat. If you use foil during the stall period, you get to retain all the juices and your brisket comes out incredibly moist!

  • What are the advantages of butcher paper over foil or just smoking without either?

Answer: Butcher paper lets the meat breathe, holding the moistness in the meat, but without making the bark (crust) soggy.  Foil will act as a seal and steam the meat and will make most barks mushy or soggy when unwrapped. Once you wrap the brisket, there’s no need to continue adding wood to your charcoal.” Wrapping does create a tenderer and juicy product, and it can speed up the cooking process, but you will sacrifice the true BBQ Pit flavor of crusty smokey brisket or butts.

Pros

  • Cut down on cook time – Like I mentioned, by wrapping the brisket you can power through the stall and you can enjoy your delicious smoked brisket even faster.
  • Keep meat moist and tender – Brisket is a bit of a fickle beast; it needs to be smoked for a long period of time in order for the fat and collagen inside to break down, but if you cook it for too long it will begin to dry out. Wrapping it will help keep it moist and tender.
  • Stops meat taking on smoke – Too much smoke can give your meat a lighter fluid flavor. Once it is hit about 145°F internal temp more smoke will not add much flavor.
  • You can hold for several hours – Once you remove meat from your cooker it will begin to rapidly cool down. An easy way to combat this is to “hold” your brisket in a dry cooler filled with towels (more on this later). By wrapping your brisket, you can easily transfer from the cooker to your cooler with little to zero mess.

Cons

  • Ruins bark – If you wrap your meat too early, or if you just cook it for too long while it is wrapped you run the risk of your bark becoming nothing more than a wet and mushy mess.
 Cook Time Bark Taste
Foil11 Soft Beefy
  
Butcher Paper11.5Little CrunchMedium
  
Straight Up12 Crunchy Smoky
  • Why is Low & Slow Cooking So Effective on Briskets?

Answer: Over the hours, a low heat tenderizes the meat and helps the smoke flavor get deep into the brisket Higher temps cook the brisket faster, but the meat will not be as tender or smoky tasting. Remember, you cannot rush great barbecue. Plan on about 1½ hours per pound of brisket

 Here is more information on. Low & Slow Smoking

  • Can I separate the Point & Flat and cook separately?

Answer: Yes, if you want to separate the point from the flat and be able to maximize the flavor in the point is very simple to do.Once the flat of the brisket reaches 170 Degree internal, separate the point and flat with a long slicer knife by cutting through the fat seam.Once the point is separated reapply your rub on the part that needs rub applied.  Here is a video of the steps of splitting during the cook.

How to trim a Choice/Select Brisket Video

Three Little Pig’s No Wrap “Texas Style Brisket”

Ingredients:

1-12-14 pound whole packer brisket

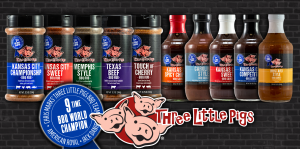
1-Cup of Three Little Pigs Mustard BBQ sauce

1-Cup of Three Little Pig’s Texas Beef rub

1/3 Cup of Three Little Pig’s Memphis rub

Instructions:

  1. Store your brisket in the refrigerator until you are ready to start trimming. Cold briskets are much easier to work with. Flip your brisket over so the point end is underneath. Remove any silver skin or excess fat from the flat muscle. Trim down the large crescent moon shaped fat section until it is a smooth transition between the point and the flat. Trim and excessive or loose meat and fat from the point. Square the edges and ends of the flat. Flip the brisket over and trim the top fat cap to about 1/4 of an inch thickness across the surface of the brisket.
  2. Cover the brisket on the top side with a coat of Three Little Pigs Mustard BBQ sauce to help bind the rub to the brisket to maximize the crusting process.
  3. Distribute the Texas Beef Rub across the top of the brisket that is going to be faced up on the smoker.  Using a Jaccard tenderizer, tenderizer the brisket and drive the rub into the brisket. Once done tenderizing distribute a coat of the Memphis rub and repeat the tenderizing process. Come back with a final coat of the Texas Beef rub to finish before going to the smoker.
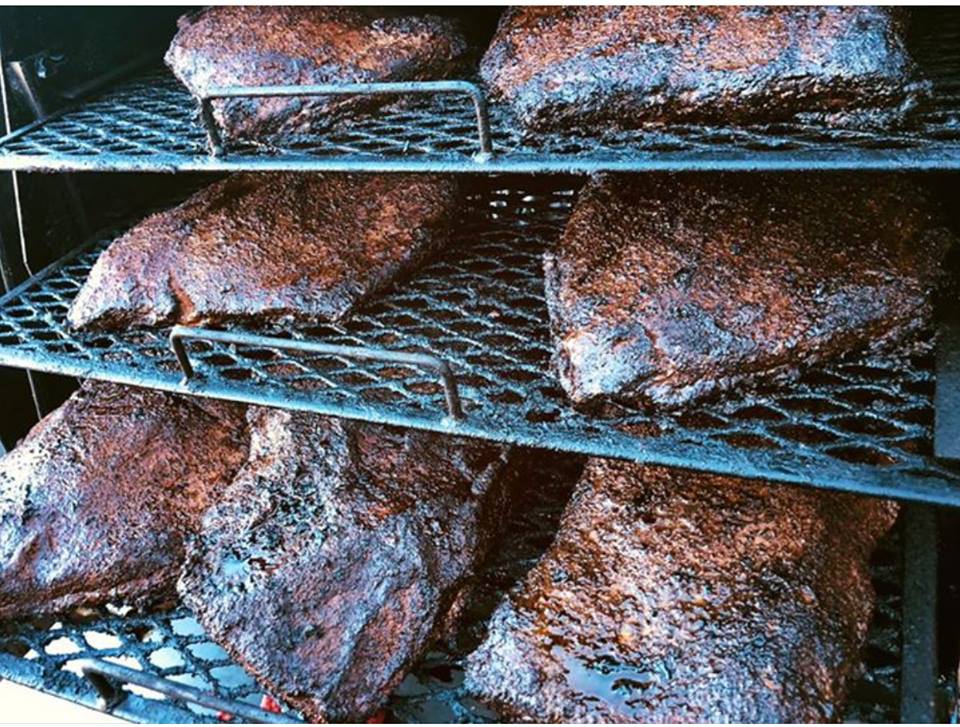
  4. Preheat your smoker to 250-275 degrees F using indirect heat and hardwood lump charcoal smoke. Place the brisket on the smoker with the point end facing your main heat source. This is a thicker part of the brisket and it can handle the additional heat. Close the lid and smoke until and internal thermometer reads 200-205 degrees F (usually takes around 10-12 hours).
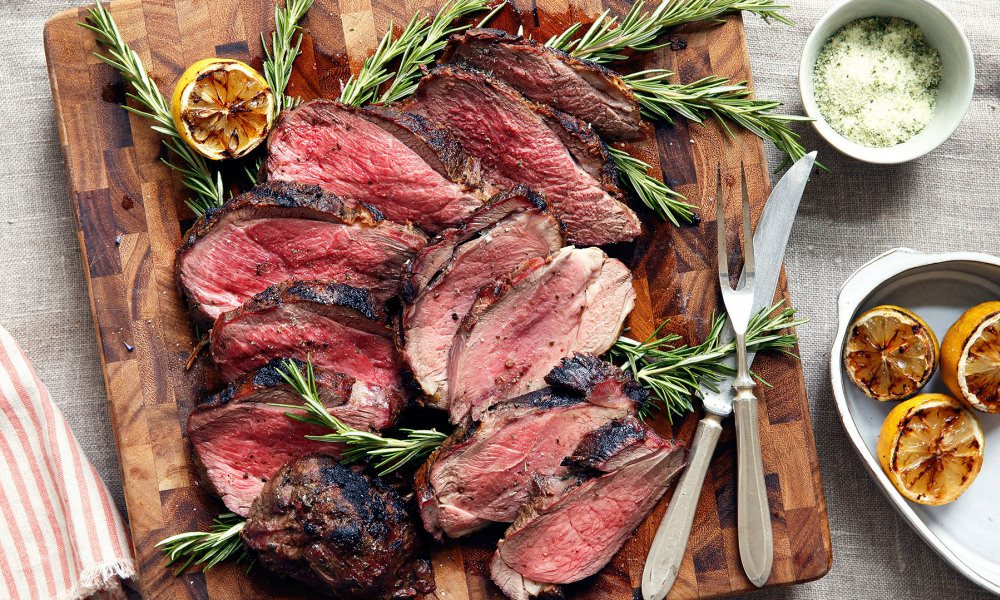
  5. Remove the brisket to a large cutting board and allow to rest for 30 minutes before slicing. Slice both the point and the flat against the grain with a sharp knife and serve immediately.

Chris Marks (CBBQE) Chief BBQ Expert Three Little Pig’s BBQ Rubs/sauces

Posted in BBQ Tips, Meats, Recipes, Side Dishes | Tagged , , , , , , , , , , , , , , , , , , , , , , , | 6 Comments

Does the Wood used to Smoke Meat Make a Difference?

Different types of wood are commonly used when smoking meats to add enhanced levels of taste, smell, and color, as well as flavors like cherry, oak, peach, hickory, apple to the meat. Wood can also add bitter, more savory, rich hints to the meat with using mesquite.  

The wood used to generate any smoke should be a hardwood such as post Oak, Hickory, Apple, Cherry or Mesquite. Pine,Cider,Cypress or any other resinous wood or sawdust are not recommended because the smoke from these woods will be sooty and strong-smelling.

Hardwoods are made up mostly of three materials: cellulose, hemicellulose, and lignin. Cellulose and hemicellulose are the basic structural material of the wood cells; lignin acts as a kind of cell-bonding glue. Some soft woods, especially pines and firs, hold significant quantities of resin, which produces a harsh-tasting soot when burned; these woods are not often used for smoking.

Cellulose and hemicellulose are aggregate sugar molecules; when burnt, they effectively caramelize, producing carbonyls, which provide most of the color components and sweet, flowery, and fruity aromas. Lignin, a highly complex arrangement of interlocked phenolic molecules, also produces a number of distinctive aromatic elements when burnt, including smoky, spicy, and pungent compounds such as guaiacol, phenol, and syringol, and sweeter scents such as the vanilla-scented vanillin and clove-like isoeugenol. Guaiacol is the phenolic compound most responsible for the “smoky” taste, while syringol is the primary contributor to smoky aroma. Wood also contains small quantities of proteins, which contribute roasted flavors. Many of the odor compounds in wood smoke, especially the phenolic compounds, are unstable, dissipating after a few weeks or months.

Since different species of trees have different ratios of components, various types of wood do impart a different flavor to food. Another important factor is the temperature at which the wood burns. High-temperature fires see the flavor molecules broken down further into unpleasant or flavorless compounds. The optimal conditions for smoke flavor are low, smoldering temperatures between 570 and 750°F. This is the temperature of the burning wood itself, not of the smoking environment, which uses much lower temperatures. Woods that are high in lignin content tend to burn hot; to keep them smoldering requires restricted oxygen supplies or a high moisture content.

Smoking Woods (FAQ’s) Frequently Asked Questions

What wood should you not smoke with?

Avoid wood from conifers such as pine, redwood, fir, spruce, cypress, or cedar. These trees contain high levels of sap and turpentine’s which results in a funny taste and can make people sick. Cedar planks are popular for cooking salmon, but do not burn the wood for smoke

Should you soak wood chunks before smoking?

In truth, soaking your wood chips and chunks is not necessary and here is why. Wood chips and chunks that have been soaked have to get rid of any moisture before they can produce smoke. There is not enough moisture to produce significant steam or smoke, however, it will produce flavor on your food.

What is the Best Wood for Smoking Meat?

Why does my smoked meat taste bitter?

Identifying Creosote, the Bitter Flavor on Smoked Meats. The secret of barbecue is heat, time, and smoke. … You need to bring smoke to the meat, but you cannot hold it there for too long. Smoke that becomes too heavy or stays for too long creates a substance called creosote.

What color should my smoke be when smoking meat?

The first bit of smoke coming out of the exhaust will be dark gray, then it will become white as the fire progresses, and eventually it will move to the desired blue smoke stage. This is the smoke color you want to maintain throughout the cooking process

At what temperature does meat no longer absorb smoke?

Depending on the meat and how hot your fire is, most will stop absorbing smoke anywhere between 140–150 degrees

Should bark be removed from wood for smoking meat?

I personally do not waste a lot of time with trying to remove the bark. Bark being left on your stored wood increases the chances of a good home for bugs and will also hold moisture and can cause the wood to start rotting quicker if not stored in a dry place.

Can you use fresh cut green wood in a smoker?

Conventional wisdom says that walnut, elm, eucalyptus, and sycamore are also unfit for smoking. Likewise, any green wood — that is, freshly cut wood that has not been properly seasoned (dried) — will contain too much moisture and sap, making it burn unevenly and sometimes imparting an unpleasant flavor.

Chris Marks CBBQE (Chief BBQ Expert) Three Little Pig’s Rubs & Sauces and Good-One Smoker/Grills

Posted in BBQ Tips, Meats, New Products | Tagged , , , , , , , , , , , , , , , , , , , , , | Leave a comment

How to Grill a Butterflied Leg of Lamb

Preparing lamb differs from beef in that it contains several lean cuts, such as the shoulder, rib, and leg…From a health perspective, that is excellent news. For the home cook, it means that you must balance doneness without drying out the meat. A butterflied leg of lamb removes the challenge of ensuring that it’s cooked through to your desired temperature without charring the outside.

Let’s go through the cooking process step-by-step.

Prep

Your butcher can take care of the cut or you can remove the leg bone yourself. The key to grilled a butterflied leg of lamb is…

Even thickness.

After trimming any excess fat, place the meat between two pieces of plastic wrap or inside of a Ziplock bag. Pound it gently with a kitchen mallet.

At this point, you have some choices to make.

You can marinate the lamb with a rub, a selection of fresh herbs with olive oil, or use a barbecue sauce to baste it over the coals.

You can also tie the meat into a roast with kitchen twine and smoke it. It’s a tasty way to make buying this smoker a smart investment.

Spice and Herb Options
Garlic and rosemary are the soulmates of lamb. However, they aren’t your only choices. It also works well with Mediterranean spices like turmeric and cumin. Give it a French twist with tarragon or herbes de Provence.

The possibilities are endless.

Getting Ready for the Grill
You should bring the lamb to room temperature before you cook it. That will assure even cooking throughout the meat. If you’re using a marinade, it’s a great opportunity to do both things at the same time.

Since it is a relatively large cut, you’ll find it helpful to use skewers both horizontally and vertically tomake it easier for you to turn on the grill.

Prepare your grill to get it to medium to medium-high heat. A quick gauge of this temperature is being able to keep your hand over the coals for about 5 seconds.

Remove the meat from the marinade and pat it dry with paper towels, which you should do anyway even if you didn’t marinate it. That will prevent the lamb from sticking to the rack.

Get Set! Barbecue!

You will need a set of tongs, hand oven mitt, and an instant-read thermometer. Also, have a platter with a sheet of aluminum foil within reach. It’s essential not to use the same plate that held the raw meat to
prevent foodborne contamination.

Make sure the rack is clean and oil it lightly. You can grill the meat for 10 to 15 minutes on each side, depending on the doneness you prefer. FoodSafety.gov recommends an internal temperature of 145 degrees Fahrenheit for fresh cuts like the butterflied leg of lamb.

That temperature puts it in the medium-well category, which can be a bit tough for a lean cut like this one. If you prefer something different, the ranges for the doneness levels are as follows:

● Rare: 120 degrees Fahrenheit
● Medium-rare: 125 degrees Fahrenheit
● Medium: 135 degrees Fahrenheit
● Medium-well: 145 degrees Fahrenheit
● Well-done: 150 degrees Fahrenheit

You should, of course, verify the temp with your instant-read thermometer to be certain. Place it on the clean platter, and cover lightly with the foil. Remember that the temperature will continue to rise as it sits.

We recommend waiting at least 10 minutes before you cut into the lamb.

Using a Barecue Sauce

The method for using a BBQ sauce varies slightly because of the basting. We suggest that you use the sauce as you grill the meat. Don’t coat it before you put it on the coals.

The reason is…sugar.

Since your medium to medium-high grill is over 350 degrees, the sugar will likely burn first instead of getting the yummy caramelized effect from the Maillard reaction. You might also risk a flame-up when the sauce hits the coals.

Not a good thing when you have a platter in hand and tongs in the other.

Final Thoughts

Lamb is a healthy lean protein that makes a delicious addition to your grilling rotation. It cooks quickly and is versatile for a wide range of cuisines. The smoky goodness that the barbecue adds makes it taste
that much better. Get out of the beef and hamburger rut! Give lamb a chance for something new.

Annabelle Carter Short is an experienced writer, editor, proofreader, blogger, teacher and photographer. She likes to cook, sew, and she’s very passionate about healthy food that tastes delicious. She loves designing new healthy recipes in her kitchen. She writes for seriouslysmoked.com

Posted in BBQ Tips, Meats, Recipes | Tagged , , , , , , , , , , , , , , , | Leave a comment

Basic 101 Grilling & Smoking Chicken for the Beginner

Have you ever cooked a perfect chicken? Were the breasts moist and tender and the leg completely cooked? Chances are, not always. Why is it so hard to get the dark meat cooked perfectly without over cooking the white meat? The reason is that a chicken is two distinctly different kinds of meat. The breast meat is very different from the leg, thigh and wing meat. This can create a real challenge when it comes to cooking the perfect chicken.

The make-up of a chicken:

At the biochemical level a chicken is a combination of approximately 3 parts water to one-part fat and one-part protein. Most of the meat comes from muscle fibers in the chicken, which are mostly proteins – notably myosin and actin. Because chcikens rarely fly but rather walk, they contain far more fat in their legs than in their breast, which results in the strong differences in texture between these sections of the bird – and the difficulty in making sure that all portions of the bird are properly heated.

The science of cooking a chicken:

As you cook the chicken, muscle fibers contract until they begin to break up at around 180 degrees Fahrenheit. Bonds within the molecules begin to break down, causing proteins to unravel, and the dense muscle meat to become tenderer. Collagen in the bird (one of three protein fibers that attach muscles to the bone) breaks down into softer gelatin molecules as it unwinds.

The dryness of a chicken is a result of muscle proteins coagulating within the meat, which can result if it is cooked too long.

Temperature differentials in cooking a chicken:

Part of the problem, as described above, is that the different nature of the light and dark meat in a chicken results in different rates to reach the coagulation of the muscle proteins. If you cook it too long, the breast meat has coagulated; if you don’t cook the bird long enough, the dark meat is still tough and chewy. Harold McGee, a food science writer, indicates aiming for 155 – 160 degrees Fahrenheit in the breast), but you want 180 degrees or above in the leg.

Common Myths:

Myth #1: You should wash raw chicken before cooking it.

Bad idea. In fact, the USDA advises against it. When you wash raw poultry, the pathogens get on your hands and in the sink. Cooking poultry thoroughly deactivates these pathogens, so you should avoid handling raw food as much as possible. If you use a cutting board, sanitize it and the knife properly, and discard the packaging carefully.

  Link to more Information: https://three-little-pigs-bbq.com/to-wash-or-not-wash-raw-meat-poultry/

Myth #2: Removing chicken skin and fat will help lower my fat intake.

 Not really. If you do this, your chicken will be dry and flavorless. Cook your poultry with all its skin and fat, and it’s fine to eat some cooked skin. In fact, it can be healthful if it comes from a well-raised chicken.

Myth #3: Yellow chickens have more fat than paler chickens.

 Not necessarily. A chicken’s pigment comes from the color of its feed. A chicken that eats feed containing xanthophyll will have more yellow hue than one that does not. Either way, chicken skin is not an accurate measure of its fat content, nutritional value, tenderness or flavor.

Myth #4: If the Chicken label says “fresh,” then it’s fresh.

 Not always the case. According to the USDA, any poultry stored below 0 degrees Fahrenheit is considered “frozen” and above 26 degrees Fahrenheit is considered “fresh.” However, a turkey at this temperature is neither “frozen” nor “fresh.”

Myth #5: Cooking a chicken until its “juices run clear when pricked” is standard poultry advice but, according to Cook’s Illustrated, it’s not a very dependable way to tell if your chicken is properly cooked

So how do you know when the smoked chicken is done?

  • Use a thermometer. It is the best way to know that your bird is safe to eat. Chicken is cooked at 165 degrees F but when smoking you want to overcook it. Test the temperature in the thickest part of the chicken breast. A good smoked chicken will be very tender, have a late summer tan, pink meat.


                     Cooking times and temperatures for chicken pieces:

  Temp  Time  Finish 
Chicken Thighs  250 1.5 Hr.  170
Whole Chickens  250 3.0Hr  170-Dark 165 White
Chicken Quarters  250 2.5Hr.  170
Breast (Boneless)  250 1.0Hr.  165
Wings  250 2.0Hr.  170
1/2 Chickens  250 2.0Hr.  170-Dark 165 White
       

Why is smoked chicken skin tough? 

 “The Chicken Skin Problem” One of the biggest issues with smoking chicken is the skin. Roasted at high temperatures, chicken skin will render fat and moisture and can become crisp and easily bitten through. Slow smoked, at a low temperature, the skin can become tough and  rubbery

How do you make smoked chicken skin crispy? 

Try bumping your temperature up to at least 350 when you smoke it. OR, you can throw it under the broiler for 2-4 minutes once you take it off the smoker. I smoke my chickens at 250 and use Three Little Pigs Championship rub on the skin and add a couple tablespoons of corn starch, never have much of an issue with crispy skin.

Why Brine Chicken?

  • Brining chicken not only adds moisture to the chicken, making it nice and plump, it also helps prevent it from drying out when you cook it. The result is a delicious, moist and juicy chicken.
  • Brining not only affects the texture and juiciness of your chicken, it also affects the taste. A few hours in a brine will let salt penetrate deep into the chicken meat, enhancing its natural flavor.
  • Of course, there is one disadvantage. All the extra water that ends up in the chicken can make it harder to get a crispy skin. Luckily, that’s easy to fix.

How Brining Works

Brining is a neat little bit of science at work. In this section, I’ll talk about what goes on when you brine chicken.If you understand what’s going on, it’s easier to modify the technique a little bit to suit your taste or apply it to a new situation.

       There are two major processes at work during brining:

Diffusion. This is when particles move from a region of higher concentration to an area of lower concentration. For example, when you’re brining chicken, the brine has a lot more salt in it that the chicken. To balance things out, the salt gets absorbed by the chicken — not just on the surface, but all through the meat (although it does take a bit of time).

Osmosis. This is when water (or another liquid) moves through a membrane from one region that has more water to another region           that has less water. When you brine chicken, you’re creating just that situation: the brine has a lot more water than the chicken, so the water moves through the chicken cells, from the brine to the chicken. The result? Moister chicken!

On top of diffusion and osmosis, there’s another neat thing that happens when you brine chicken. When the salt gets inside the chicken flesh, it makes some of the protein’s molecules unravel. Then, when you cook the meat, the unraveled proteins interact and create a kind of shield that holds the moisture in.

More information on brining: https://three-little-pigs-bbq.com/what-is-a-brine-and-how-does-it-work/

This chart can be used for general guidelines; however, in some cases recipes will specify different formulas and times:

Chicken  Cold Water Table Salt  Suger  Time   
1 whole Chicken  2 quarts 1/2 cup 1/2 cup  1 hour   
2 whole chickens  2 quarts 1 cup  1 cup 1 hour   
4 pounds bone-in chicken pieces (whole breasts, split breasts, whole legs,thighs, and/or drumsticks)                
  2 quarts 1/2 cup 1/2 cup  1 hour   
4 boneless, skinless chicken breasts (6 to 8 ounces each)     
  2 quarts  1/4 cup 1/4 cup  1 hour   

 How to Inject a Chicken, we all know that chicken tends to be a dry meat especially in the best area. This is a way to push moisture into your chicken while infusing it with great flavors at the same time. Just remember that this is a marinadeso it will need some time in the meat to get the flavors.

5- Points of Injections Chicken. 

Different “Whole” Chicken Cooking Methods

Beer Can Chicken:

  • Beer can chicken the only thing beer can chicken does is wastes a perfectly good can of beer.
  • The 12-ounce can insert into the rear end of a chicken does not distribute beer flavor, nor will it boil and steam the bird cavity and make it moister. The product tastes delicious because roasted chicken cooked over hot coals tastes delicious.
  • The chicken cooks uneven due to the breast being set high on the stand into the heat verses the legs and thighs cooking lower.
  • The beer can, snugly nestled in the cavity, blocks heated air from flowing through the bird. As a result, there is the very real danger the interior will not cook quickly enough to prevent bacteria from developing.
  • Beer can interiors are coated with an epoxy that contains Bisphenol A (BPA). Is the popular method of cooking a chicken perched on an open beer can really a good idea? Some studies have linked BPA to cancer and other harmful health effects.
  • For those who have any remaining concerns, there is always the vertical roaster, which works just as well and cleaner as a low-tech option.

Spatchcocking Chicken, A spatchcock chicken (also called “butterflied chicken”) is a whole chicken with its backbone removed. The chicken is then opened like a book and laid flat before smoking. (And it’s a whole lot easier than it might sound.)

Benefits of Spatchcocking:

  • Cooks Faster: Flattening the Chicken out exposes more surface area to heat, so overall cooking time is reduced. A 10-pound spatchcock turkey was done in only 2 hour 45 minutes at 250º F. Compare that with the 4 to 4½ hours it takes to cook an unstuffed whole chicken at the same 250º F.
  • Crisper Skin:  All the skin is exposed evenly to the heat, with none of it hiding on   the underside. That means it all crisps up evenly. And who doesn’t love crispy skin?
  • Juicier Chicken: Chicken has two different kinds of meat that are cooked through at two different temperatures. And there’s the problem. Breast meat starts drying out after it reaches 150° F, but dark leg meat isn’t thoroughly cooked until 165° to 170° F. People try all kinds of tricks to keep the breast from drying out while the legs are still cooking, but simply opening the turkey and cooking it flat brings both kinds of meat to doneness at the same time. Problem solved.

How to Spatchcock a Chicken:

  • Place the chicken breast-side down with the tail facing you. Using kitchen shears, cut along one side of the backbone, then repeat on the other side of the backbone.
  • Turn the chicken breast-side up and spread it out on the cutting board. Press down on the breastbone with the palm of your hand to flatten the chicken.
  • Use a chef’s knife to split the chicken into two halves if you like
  • Trim any large pockets of fat.
  • Season both sides with olive oil and rub.

Link to Video on Spatchcocking: How To Spatchcock a Chicken

 2 Part Video on Grilling a Spatchcock Chickens.  

Video 1 the Preparation:

On the Preparation process the chicken was spatchcocked (Backbone removed), Rub Some Butt Carolina  Mustard BBQ sauce was applied to front and back of the Spatchcocked chicken and Three Little Pig’s Memphis  BBQ rub was applied to both sides. Then I used a Jaccard tenderizer to puncture the skin on the breast side to help render the fat to force flavor deeper in the chicken.

Tools Used: 

  1. Three Little Pig’s Memphis BBQ Rub
  2. Three Little Pigs Mustard BBQ Sauce
  3. Jaccard Tenderizer
  4. PK360 Grill
  5. Grill Grates
  6. Lump Charcoal

 Video 2 the Finish: 

I added the Chicken on the PK360 Grill, once the temperature reached 350 degrees and maintained that temperature the entire cook. I grilled the breast meat to 165 degrees and the thighs and drums to 175 degrees. The dark meat will cook quicker due to higher fat content and not as dense as the breast meat. The Grill time was 1:20 minutes to hit temperatures running at 350 degrees.

Three Little Pig’s Boneless Chicken Breast Recipe:

Link to Pulled Chicken Breast Recipie : Chicken Breast Recipe

Pulled Chicken

BBQ Pulled Chicken with a tender whole chicken cooked on a smoker, grill, oven, or crock pot is so easy and convenient you will be amazed at results.

How to Make Pulled Chicken:

Pulled chicken is generally made one of three ways, cooked on a smoker or grill, cooked in an oven, or cooked in a slow cooker. They all have their merits but the making pulled chicken recipe no matter how in an oven is the easiest option that keeps the chunks firm and flavorful, the smoker and grill has the most flavor and zest  (the slow cooker is the easiest option but the meat will fall apart with served).


Link to Pulled Chicken Recipe: Southern Pulled Chicken

Chris Marks CBBQE (Chief BBQ Expert) Three Little Pig’s Rubs & Sauces

Posted in BBQ Tips, Meats, Recipes, Uncategorized | Tagged , , , , , , , , , , , , , , , , , , , , , , , , , , , , , , , , , , , , , | 2 Comments

Poor Man’s “Double” Burnt Ends (Smoked Chuck Roast)

Poor Man’s “Double” Burnt Ends (Smoked Chuck Roast)

This is going to be a real treat if you have not experienced a smoked poor man’s burnt ends meal.

Using a chuck roast instead of smoking a whole brisket, puts this recipe in the “poor man” category. You will be surprised at the culinary magic that happens when you smoke a properly seasoned chuck roast to make burnt ends. Forget the brisket. You don’t need it. A beef chuck roast is all you need to astound your family and friends. Also, your wallet will be happy, due to the saving at the grocery store. Pick an evenly marbled roast for the best results.

Ingredients

Instructions

  1. Set your smoker to low heat at 250°F.
  2. Apply a generous amount Three Little Pigs mustard BBQ sauce and add Three Little Pig’s Texas beef rub all around the chuck roast and top with Three Little Pigs Memphis rub.
  3. Use a Jaccard Tenderizer to tenderize and drive the rub down into the chuck roast.
  4. Place the chuck roast into the smoker and let it smoke until internal temperature reaches 195°F. 
  5. Once meat is done, pull it out of the smoker and let it rest for 15 minutes. 
  6. Slice chuck roast into small bite size cube pieces.
  7. Place sliced meat in a foil pan and add Three Little Pig’s Competition BBQ Sauce to lightly coat the meat and sprinkle some more Texas beef rub.
  8. Place the meat back in the smoker at 250°F for 1 hour.

Chris Marks -CBBQE (Chief BBQ Expert) Three Little Pig’s Rubs & Sauces

Posted in BBQ Classes, BBQ Tips, Meats, Recipes | Tagged , , , , , , , , , , , , , , , , , , | Leave a comment

Beef Tenderloin 101 Tutorial

What Is a Beef Tenderloin?

Beef tenderloin is the most tender cut of beef and it is located within the loin. This is where we get filet mignon, which is made from the very tip of the pointy end of the tenderloin. There is also very little fat within the tenderloin, making it a very lean cut. Because of all that, beef tenderloin is one of the most expensive cuts of beef.

Tenderloin is the long, narrow, and lean muscle located within the Loin; this is the most tender cut of beef available. The Tenderloin is the source of Tenderloin Steak or Filet Mignon and is a component of T-Bone and Porterhouse Steaks.

What are the different cuts of the beef tenderloin?

The whole tenderloin is broken down into three parts.

  • The Butt
  • The Center Cut
  • The Tail

What is a Good Price for A FULL Beef Tenderloin?

This conversation starts and ends with Costco and Sam’s Club. Both are places to go to get beef tenderloin. They offer entire tenderloins that you can cut up yourself (unpeeled), or tenderloins already trimmed (peeled).  And if you are ever going to learn how to cut your own steaks, the tenderloin is a great start. Both offer a large selection of tenderloins peeled and un-peeled daily. You might even be able to score a better price, especially right after the holidays when they are trying to clear out inventory. The cost per pound commonly run between $9.99-$16.99 Per pound (Un-peeled) to $16.99-$24.99 per pound (Peeled) for the full strap of tenderloin. They usually both carry a stock of Choice and Prime to choose from.

  • Peeled Tenderloin– Peeled typically has the “chain” and silver skin removed (and much easier for when you trim)
  • Un-Peeled Tenderloin– Has the silver skin and surrounding muscle still on it, often referred to as “the chain”.

Can I trim my own Beef tenderloin the answer is “Yes” 3 easy steps?

  1. Remove the side chain. The side chain is that grizzly piece that runs the length of the tenderloin and is about a ½ inch in diameter. To remove it, insert your fingers between the two muscles and gently separate it with a tug. It should separate easily; you may need to use your knife to totally remove it.
  2. Next, remove the “silver skin” which is a shiny membrane on the outer side of the larger end. Insert the tip of your boning knife under the silver skin about two inches from the end and cut. Lift up on the piece of silver skin, gently slide your knife along the underside of the skin toward the small end. Repeat this until all the silver skin is off.
  3. Remove any fat nodules or hard pieces on all sides of the tenderloin by rubbing up and down the muscle with you hands, cleanup any unneeded pieces with youe knife.

          HOW TO REVERSE SEAR BEEF TENDERLOIN

Beef Tenderloin is incredible cooked on the smoker.  Use the reverse sear method to create an incredible smoky flavor, then finishing it over a hot grill for that perfect sear,  then you get the exterior texture of the hot grill marks to enhance the beef flavor.

What is the reverse sear method?

Smoke – Process in which the lower heat and smoke will flavor the meat. We use Cherry and Pecan wood and smoke at 250 degrees F until the internal temperature of the meat reaches 130 degrees F. The Tenderloin is not done yet, we are going to continue cooking over high heat to our desired finishing temperature of 145 degrees F.

Sear – When the beef tenderloin reaches the desired smoke internal temperature of 130 degrees, remove the meat and add it to a high heat to finish. In this case we removed the meat, Then increased the temperature of the smoker’s grill, then finish it by searing it over the hot grill. Alternatively, you can finish it in a searing hot cast-iron pan.

RECIPE FOR SMOKED BEEF TENDERLOIN – REVERSE SEARED

INGREDIENTS:

  • 1- 9-10-pound Un-Peeled Tenderloin
  • 1 tablespoon extra virgin olive oil

DRY RUB

Directions:

  1. Trim beef tenderloin. Remove chain mussel, remove all the silver skin and excess fat nodules off the tenderloin, remove the butt end for a uniform center cut whole tenderloin, save the scraps for other dishes.
  2. In a small bowl, combine Three Little Pig’s Texas Beef Rub & Three Little Pig’s Memphis Rub. Rub trimmed beef tenderloin with the olive oil, and liberally apply the dry rub to the tenderloin. Cover tenderloin in plastic wrap and store in the refrigerator for 2-3 hours prior to cooking.
  3. Remove the tenderloin from the refrigerator and remove from plastic wrap. Prepare your smoker using cherry or pecan wood at 250 degrees Fahrenheit.
  4. Place the tenderloin on the smoker until the internal temperature reaches 130 degrees. This should take approximately 45 minutes to an hour. Once the temperature of the meat reaches 130 degrees remove tenderloin.
  5. Prepare grill for high heat or direct grilling. Grill tenderloin 3 minutes per side and remove when the internal temperature of the tenderloin is 140 degrees F, about 8 – 12 minutes total. You will find the tenderloin has roughly three sides as it grills and it easy to rotate.
  6. Remove from heat and let rest 5 minutes prior to slicing.

Chris Marks -CBBQE (Chief BBQ Expert) Three Little Pig’s Rubs & Sauces

Posted in BBQ Tips, Meats, Recipes | Tagged , , , , , , , , , , , , , , , , | Leave a comment

ABC’s of Wagyu Beef

What are WAGYU?
WAGYU – a Japanese beef cattle breed – derive from native Asian cattle. ‘WAGYU’ refers to all Japanese beef cattle, where ‘Wa’ means Japanese and ‘gyu’ means cow. Wagyu were originally draft animals used in agriculture and were selected for their physical endurance. This selection favored animals with more intra-muscular fat cells – ‘marbling’ – which provided a readily available energy source. Wagyu is a horned breed and the cattle are either black or red in color.

Wagyu vs. Kobe Beef
You may have heard “kobe” used interchangeably with “wagyu,” or used to tout an expensive cut of meat. So, what is kobe beef? Kobe is essentially just a brand of wagyu beef, in the same way that Nike is a brand of shoe.
In order for something to be labeled as Kobe beef, first of all, it has to originate in Kobe, Japan. Then, all parties who have a hand in getting this sought-after meat to your table—from the farm to the slaughterhouse to the buyer to the restaurant—has to be licensed by The Kobe Beef Association. “Everyone is paying to be part of the thing called kobe beef,” Heitzeberg says. “But the final thing is they have to be rated A4 or A5—so everything else could be true, but if it’s an A3, you can’t call it Kobe,” Heitzeberg says.

And if you see the words “American kobe” on a menu, take it as a big red flag—American kobe doesn’t exist. “Kobe is from Kobe, Japan, just like Champagne is from Champagne,” Henderson says. “To be true kobe beef, it has to be from Kobe. [Restaurants] cold be part of an association where they’re able to sell kobe beef, but kobe beef is not able to be produced here.”

What’s the Difference Between Japanese and American Wagyu?

In addition to the looser rating system and divergent cattle-farming techniques, the biggest difference between American wagyu and Japanese wagyu is that Japanese wagyu is purebred, where American wagyu is crossbred. “[American wagyu] is still going to be crazy marbled with intense flavor, but it’s most likely wagyu bred with angus,” Henderson says.

“Almost all of that stuff is angus beef crossbred with wagyu in an uncontrolled, unregulated, unspecified percentage of DNA,” Heitzeberg says. “I’ve eaten my bodyweight several times over in Japanese wagyu and American wagyu, and I haven’t tasted anything that’s angus mixed with wagyu at any percentage that tastes like Japanese wagyu does at 100 percent

Besides yield and quality grading system, you will also find Beef Marbling System in the classification of Wagyu beef. This grading system specifically looks at the beef marbling, with 1 for the lowest marbling score and 12 for the highest marbling score.

Chris Marks CBBQE (Chief BBQ Expert) Three Little Pig’s Rubs & Sauces and Good-One Smoker/Grills

Posted in BBQ Tips, Meats | Tagged , , , , , , , , , , , , , , , , | Leave a comment

Three Little Pigs BBQ Rubs & Sauces recipe cards

Posted in BBQ Tips, Recipes, Side Dishes | Tagged , , , , , , , , , , , , , , , , , , , , , , | Leave a comment

Smoked Beer Cheese

Ingredients

2 8oz Pkgs Cream Cheese, softened

1 (oz) pkg dry ranch salad dressing mix

2 Cups (Shredded) cheddar cheese

½ cup of beer (More as needed)

2 tsp Three Little Pig’s Championship BBQ Seasoning

 Directions

  • Mix cream cheese with ranch mix until thoroughly mixed, stir in cheddar cheese.
  • Slowly mix in beer to reach the consistency you like.
  • Add Three Little Pig’s BBQ Seasoning and mix well.
  • Smoke with Apple or Cherrywood for 30 minutes.
  • Serve with crackers or pretzels.

Chris Marks CBBQE (Chief BBQ Expert) Three Little Pig’s Rubs & Sauces and Good-One Smoker/Grills

Posted in BBQ Tips, New Products, Recipes, Side Dishes, Uncategorized | Tagged , , , , , , , , , , , , , , | Leave a comment

Smoked Green Beans

Ingredients

2-(28oz) Green Beans

1lb Yukon Gold Potatoes

½ cup chopped white onion

1 lb Polska Kielboasa

1-3.5oz stick of Kerry Gold “Garlic & Herb” butter

2 tsp Three Little Pig’s All Purpose Rub BBQ Seasoning

Directions

  1. Sauté/Grill onions in Kelly Gold butter until tender.
  2. Cut Yukon Pototoes into bite size pieces.
  3. Pre cook Potatoes until tender.
  4. Drain green beans and add to large catering pan.
  5. Cut Polska Kielboasa into bite size pieces.
  6. Add the Sauté Onions,Kielboasa, Potatoes,Three Little Pigs All Purpose seasoning and remaining butter to cater pan and stir well.
  7. Smoke in smoker with wild cherry or apple for 30 minutes than cover with foil and heat until hot.

Chris Marks CBBQE (Chief BBQ Expert) Three Little Pig’s Rubs & Sauces and Good-One Smoker/Grills

Posted in BBQ Tips, New Products, Recipes, Side Dishes | Tagged , , , , , , , , , , , , , | Leave a comment